 This could be your yard (hopefully, with less concrete)!
Hate websites? Download a PDF of the instructions and print them out, grandpa.
Let’s start with what you need:
Tools
- Drill/Power screwdriver
- Handsaw (or reciprocating saw) to cut lattice
- Circular/table saw to cut planks & posts (or ask lumber store to cut to size)
Supplies
5 – 1in x 8in x 8ft wood planks
- I used cedar – Rona has this available for $14.79 each, approx. $85 for wood
2 – 2in x 2in x 8ft wood posts
- You only need four 25 inch posts, so if you can find something shorter than 8 feet, you might be able to save money (and not have left over wood)
4 – Metal angle brackets
- Can be found for between $1-$5
Screws
- For the frames/boxes: 32 – 6 x 1 ½ in wood screws (I got a pack of 50 for $5)
- For the posts: 16 – 6 x 1 ½ in wood screws (can be longer if you’re using supplies you already own. Each screw needs to go through the 1in frame plank and solidly into the 2in post)
- For the brackets: ½ inch wood screws (amount and width will depend on the brackets you get, expect at least 2 screws per bracket)
1 – 15in x 34in pieces of wooden lattice
- Size is approximate, can be a bit smaller as it doesn’t have to fit perfectly
Landscaping cloth
- To cover lattice, to keep soil in but allow for drainage
Optional: plastic tarp/sheet
- We are planning to line the side of our boxes with plastic sheet, to protect the boxes from absorbing too much moisture when the soil is watered, hopefully extending the life of the boxes
Now, what you do:
Instructions
- Cut wood planks


-
- One 8ft plank makes 2 long pieces (36in each) and 1 side piece (15in)
- Use 4 planks to cut out 2 long and 1 short pieces
- Use remaining plank to cut out 4 short pieces
- Cut posts


-
- You need 4 2×2 posts that are 25 inches tall. One for each inside corner of the box.
- This is how each frame segment will be connected
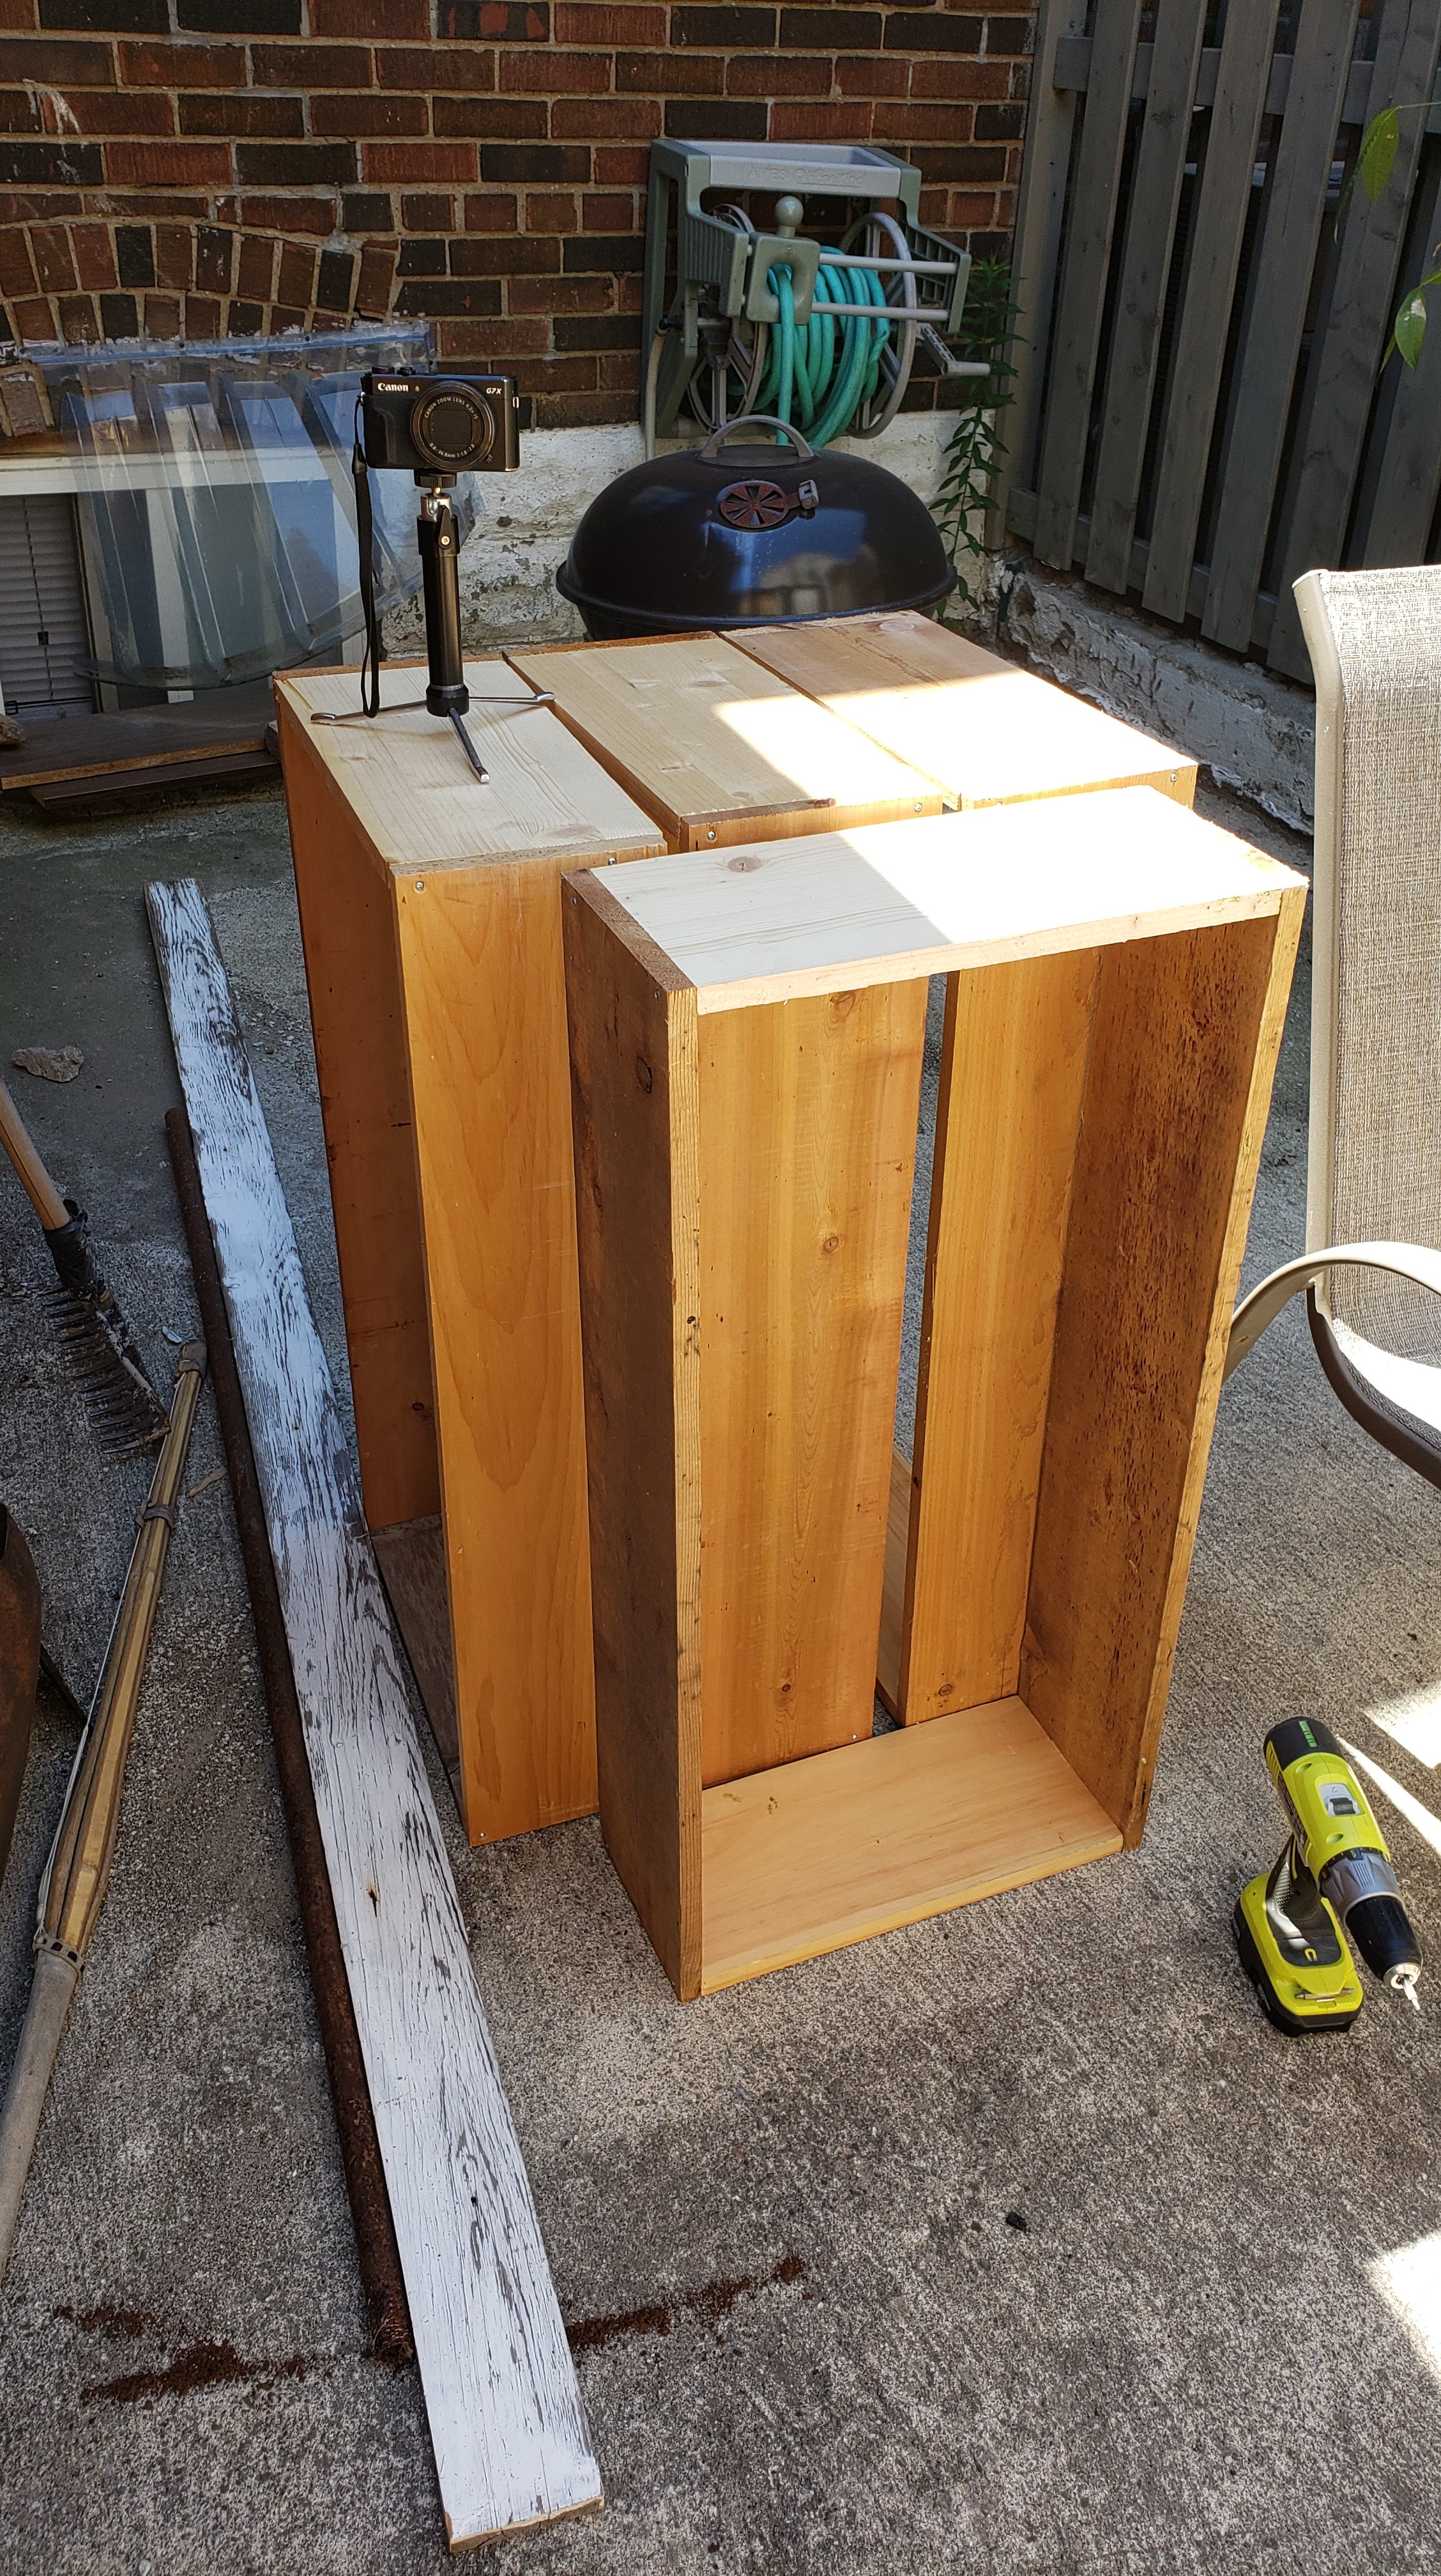
- Build each frame
- Stand 15in plank upright and line up 36in plank on top, forming an L (the 15in pieces will be on the inside of the box).
- Using a drill bit smaller than the screw size, drill two pilot holes on either side of the long plank, into the small plank
- Using 2 of the 6 x 1 ½ in wood screws, secure the two pieces where you drilled the pilot holes
- Repeat with all pieces, until you have 8 Ls
- Note: It’s faster to have two drills (one with drill bit attachment and one with screwdriver attachment – so you don’t have to switch bits between each L). Alternatively, if you have room and only one drill, you can line up all your pieces in the L configuration at the same time so you can do all the pilot holes at once, and then do all the screws at the once, without switching attachments.

- Combine 2 Ls to form 1 frame, repeating the pilot hole & screw process

- Repeat until you have 4 complete frames
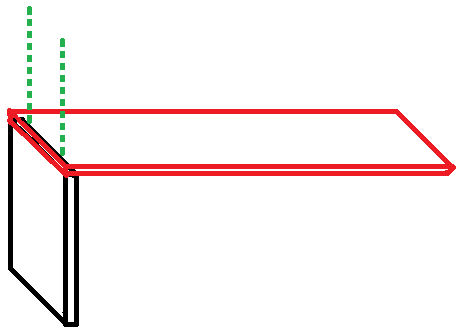
- Each frame should look like this from above (15in piece on the inside):


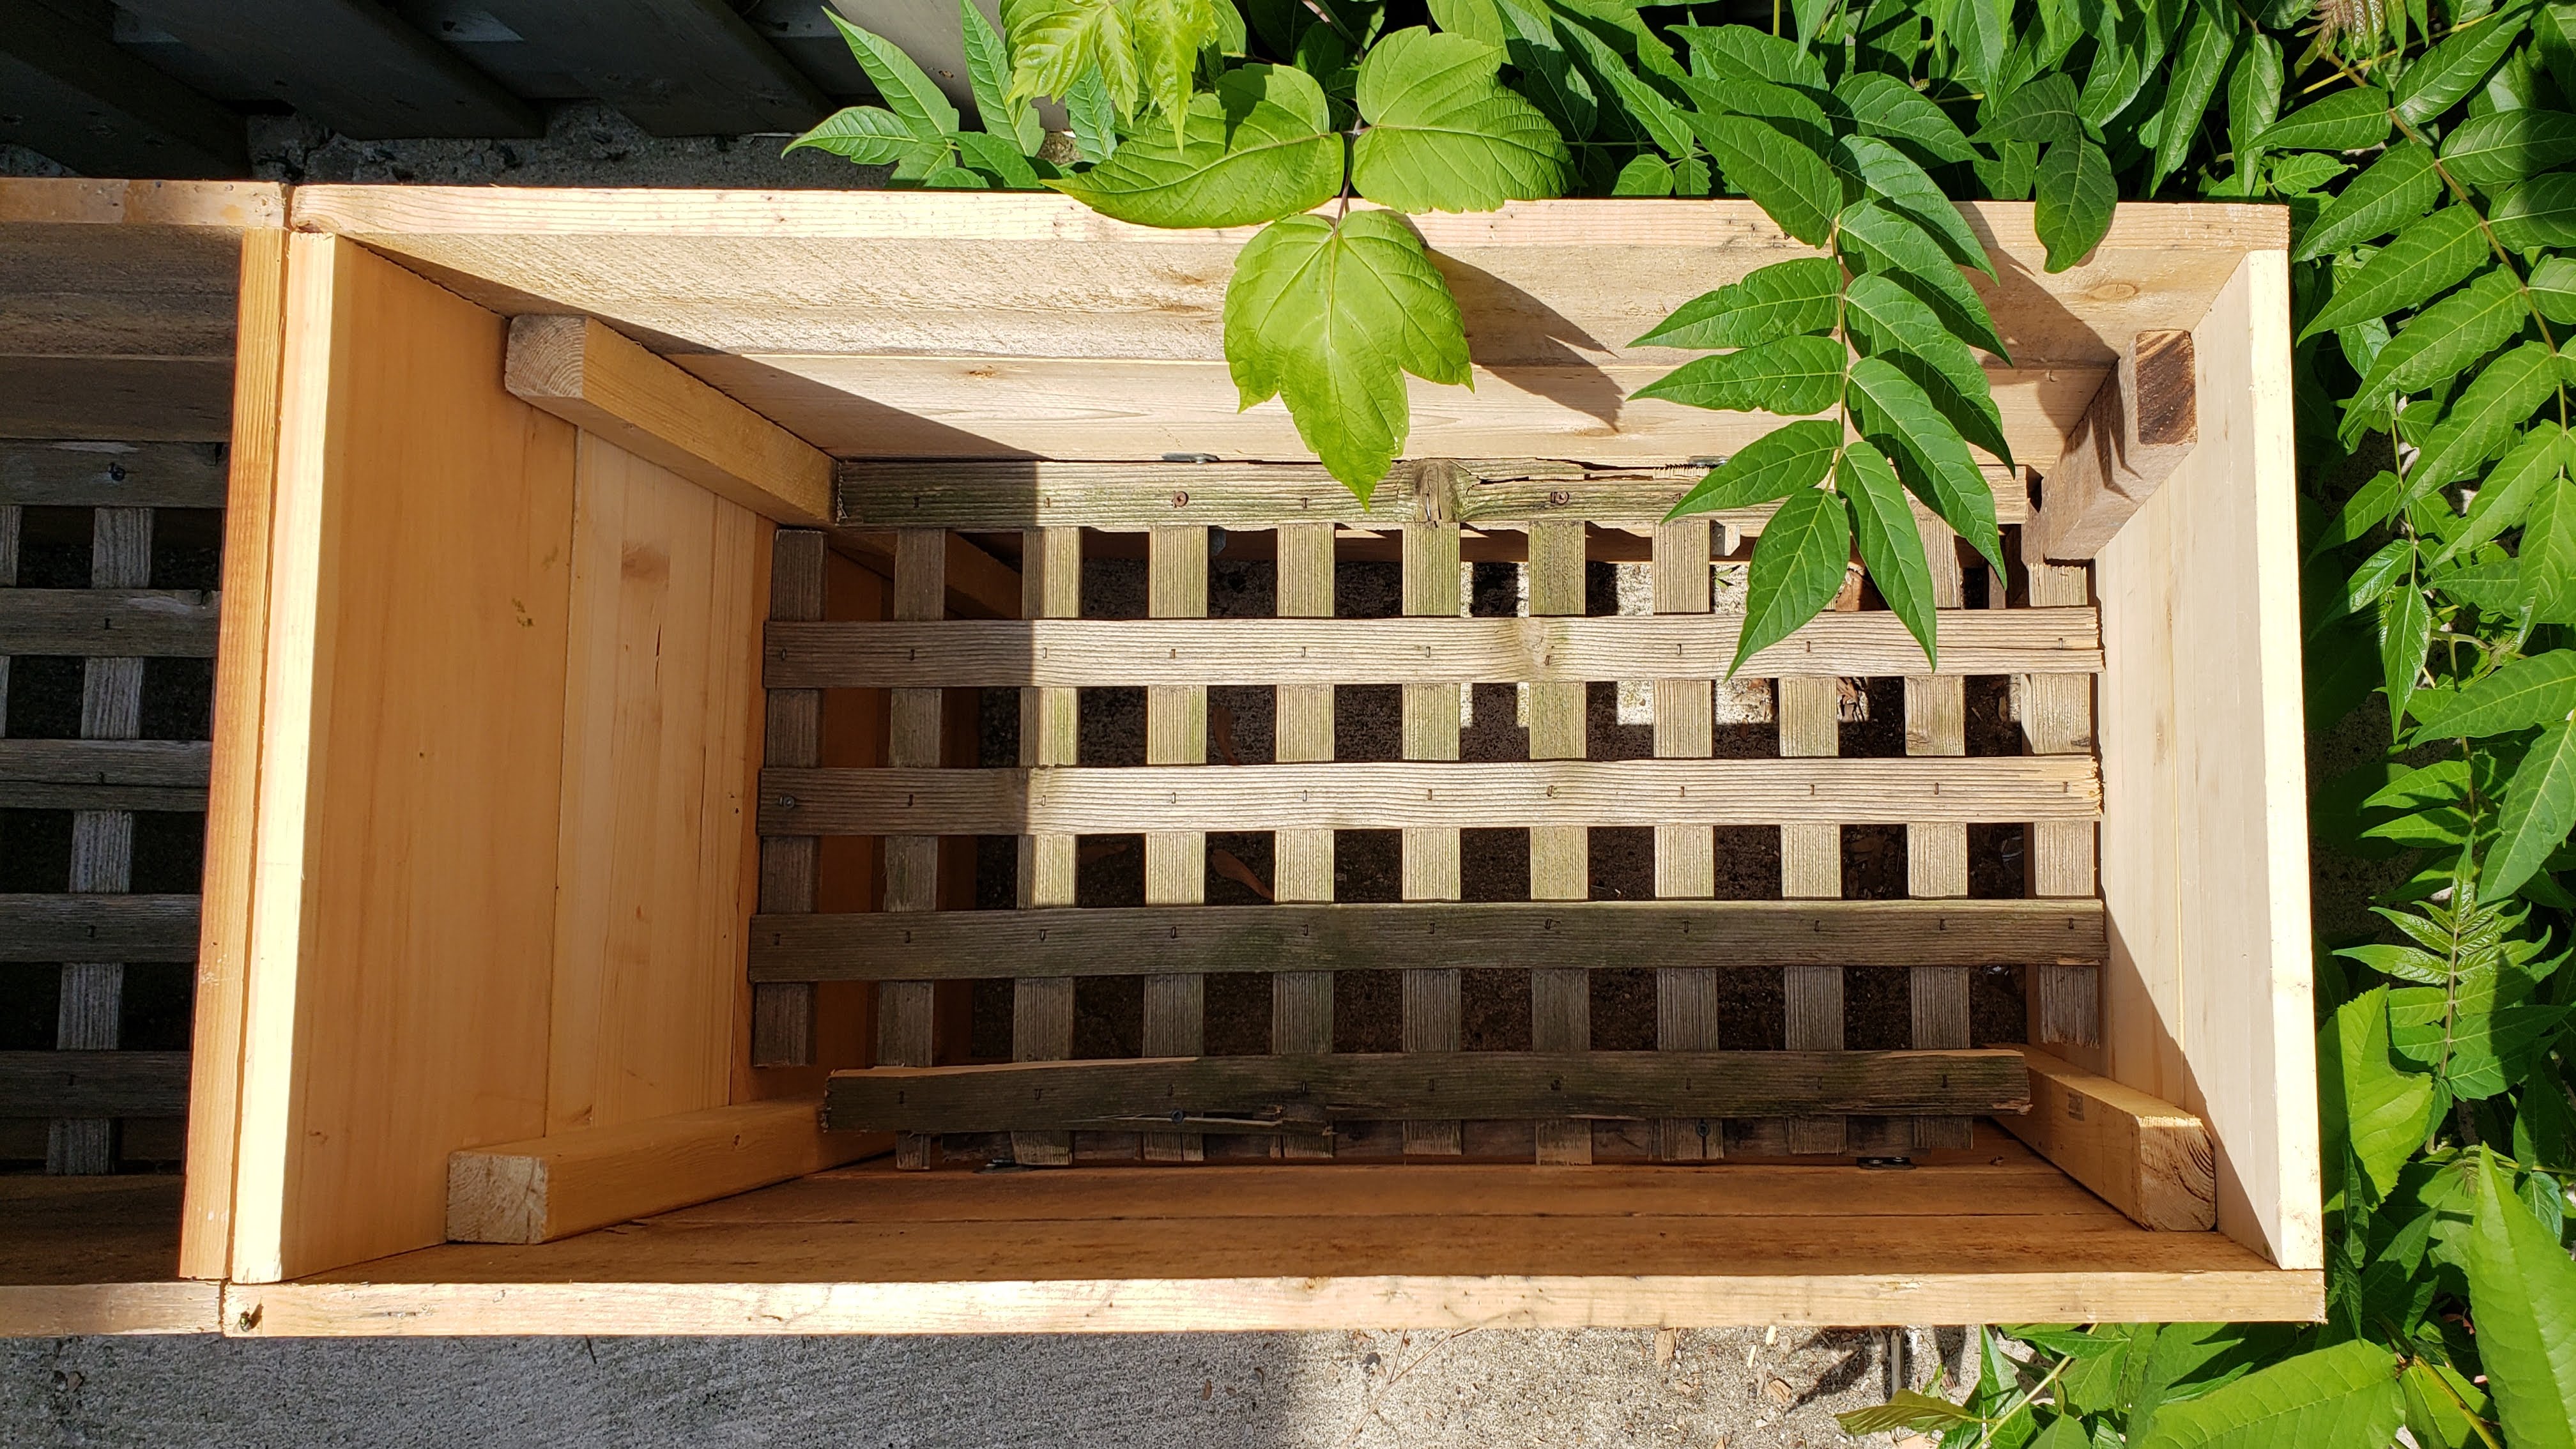
- Add brackets
- Go for something like this:
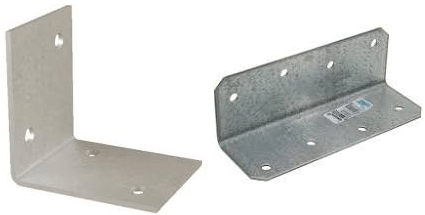
- Choose one frame on which to add the brackets
- Add 2 brackets, using ½ in screws, to the inside of each long side of the frame (I did them off-centre, as shown below, to spread out support of lattice, this may or may not have any effect). Four brackets in total.
- Secure brackets close to the top of the frame (measure to ensure they’re all relatively the same height)
- Note: Make sure that the depth of your lattice does not exceed the depth at which you place the brackets. You want the lattice to sit on the brackets and remain below the top lip of the frame.
- Go for something like this:


- Cut lattice to size
- You want the lattice to slot into the frame with the brackets – inside measurements should be roughly 15in x 34in (planks are not exactly 1in thick, so double check on your frame).
- Cut lattice to size using hand saw, or reciprocating saw if you’re fancy. It helps to clamp the lattice to something so it doesn’t wobble (wobbling is likely because it’s thin).
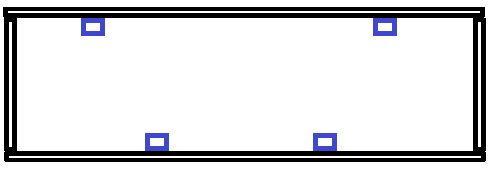
- Once lattice is cut to size, cut out enough room on each corner to allow 2×2 corner support to pass through (see blue squares below)

- Insert lattice into frame so that it sits on top of brackets (if it looks like the top of a square pie, you’ve done it right). I did not screw the lattice down, but you can if you want.
- Note: I reused lattice that I already had that happened to be attached to a frame. I used the framing pieces to lay between the brackets and the lattice for extra support. This might be helpful for you too. These pieces were not quite 1×1.

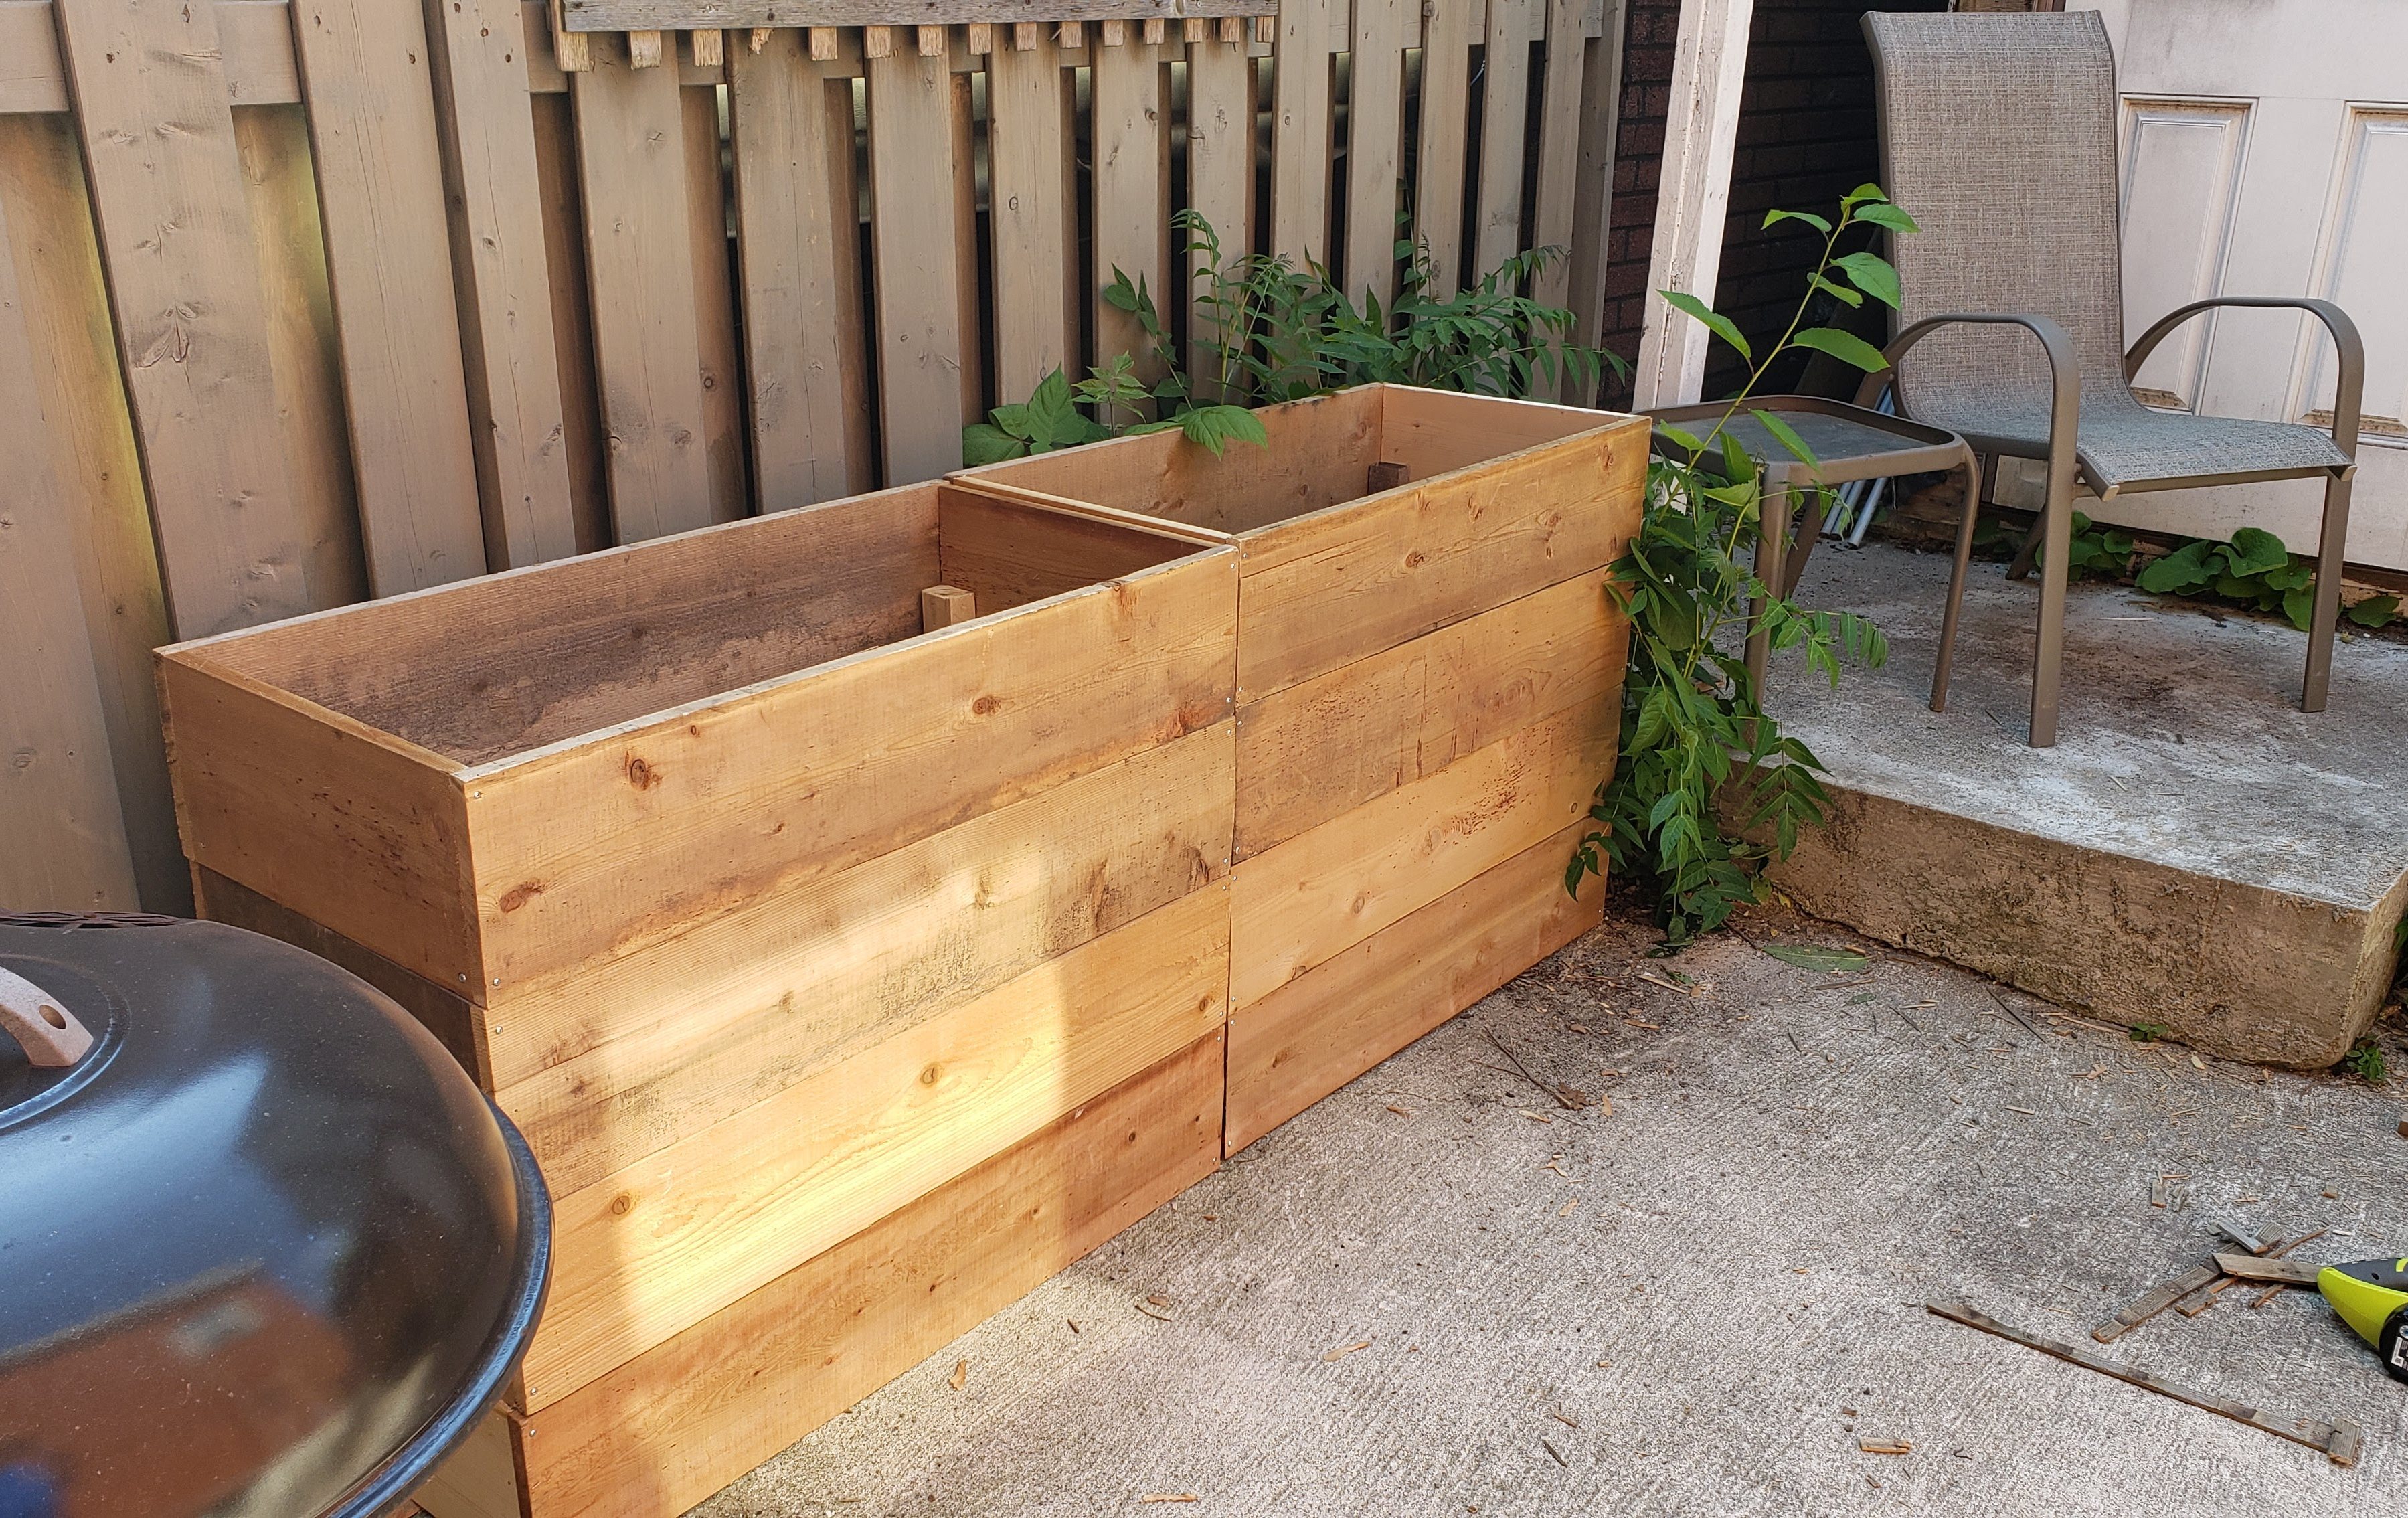
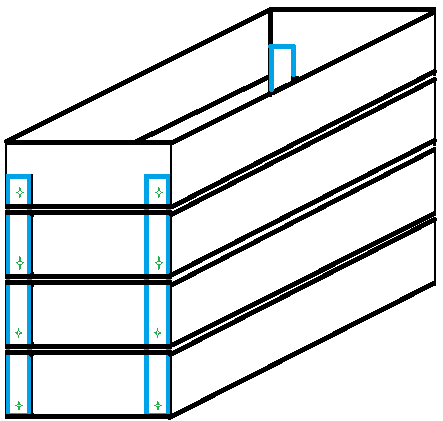
- Assemble the box
- Stack the frames on top of each other, making sure the frame with the lattice is second from bottom. This will allow two full frames for soil; the bottom two frames will remain empty (they’re just for height).
- Feed the 2×2 posts through each corner. They should come up to halfway on the top frame (so they will not be visible once soil is added)
- Using one screw per frame segment, attach the frame to the corner post from the short side (see green markings below). Do this for all 4 posts.
- Note: You can drill pilot holes first if you want, I just went for it and it worked out. Depending on your wood and screw size, you may be worried about splitting.

- Add the landscaping cloth on top of lattice (you can tack it to the walls, rather than the lattice, to keep it in place). You can add plastic sheet at this time too.
- Repeat steps 1 thru 7 if you want to make more than one planter box 🙂
- YA DONE! Plant some stuff. Enjoy your garden!
And now for… SOME PHOTOS OF WHAT YOUR PLANTER BOXES MIGHT LOOK LIKE ALONG THE WAY: